Lesson 5: Correcting Photos

Two problems that often occur when taking a picture or scanning an image are the color quality and tonal range of the image. This is not always the fault of the photographer. Adobe Photoshop allows you to correct these problems, as well as, composition, and sharpening the overall focus of the image.
Workflow
There are many uses for any given photograph. It is important that you understand how the photograph is to be used prior to editing the image. For instance, the image may be used for Internet web pages, or the cover of a magazine. Once you know how the photograph is to be used, you can begin editing the image for that purpose. The steps, or process you follow to prepare and finalize the image is called Workflow. Each workflow can follow these eight major steps, and should be done in the given order.
- Duplicating the original image or scan. (Always work in a copy of the image file so that you can recover the original later if necessary.)
- Checking the scan quality and making sure that the resolution is appropriate for the way you will use the image.
- Cropping the image to final size and orientation.
- Repairing flaws in scans of damaged photographs (such as rips, dust, or stains)
- Adjusting the overall contrast or tonal range of the image.
- Removing any color casts.
- Adjusting the color and tone in specific parts of the image to bring out highlights, midtones, shadows, and desaturated colors.
- Sharpening the overall focus of the image.
Pixels and Resolution

All digital images are created in a grid of squares. Each square is assigned a color and a position within the grid. The name of the square is a pixel. The word pixel is made up of two common words- Picture and element. The number of pixels you place within a photograph will affect the quality or resolution of the photograph. Resolution is measured in pixels per inch (ppi).
There are two generally used image resolutions. High Resolution images are usually 200 ppi or better, and are used in professionally printed projects, such as books, magazines, and brochures. These files are often too large to attach to an e-mail, so professionals must either ship them to printing companies on CD, or use Internet FTP (file transfer protocol) accounts or other web upload services to transfer them.
Low Resolution images are usually 72 ppi and are used for web pages or to send to a friend over e-mail because they will open quickly.
Pixels and Image Size

Each pixel in a digital photo adds to the size of the image file. If you pack your image with pixels, you have to deal with its huge file size. To keep your pixel count (and therefore file size) under control, follow these 4 reasons from dummies.com when creating your photo files:
1. Keep your photo files editable.
Large image files make big demands on your computer’s memory (RAM) when you edit them.
2. Make your Web-bound image files lean and mean.Huge image files on a Web page take forever to download (especially with a slow modem).
3. Don’t make your image files larger than necessary.
Use the appropriate number of pixels to suit your final output device (screen or printer), but no more so that you don’t waste pixels (and memory).
4. Decide whether you need that image in color.
Color image files are larger than grayscale pictures because a color image requires three channels of data (for red, green, and blue), but a grayscale photo requires only one. As an example, if you look at the photo in this section of the lesson, its dimensions are 750 x 940. The grayscale image file size is 714K. The full-color image size is 2.1MB, a difference of about one-third the file size.
Straightening Images

In Lesson 3 we learned that the Cropping Tool will trim images. When we capture an image with a camera or scanner, the object in the image may be crooked. We can use the cropping tool to straighten an image. Complete the following steps to straighten an image with the cropping tool.
- In the toolbox, select the crop tool.
- On the tool options bar (at the top of the work area), enter the dimensions (in inches) of the finished image: For Width, type 2 in, and for height, type 3 in.
- Draw a crop marquee around the image. Don't worry about whether the entire image is selected, because you will adjust the marquee size later.
- As you drag the marquee, it retains the same proportions as the dimensions you specified for the target size (2 x 3 inches)
- When you release the mouse button, a cropping shield (gray area) covers the area outside the cropping selection, and the tool options bar now displays choices about the cropping shield.
- On the tool options bar, make sure that the "Perspective" check box is not selected.
- In the image window, move the pointer outside the crop marquee, so that it appears as a curved double arrow. With the pointer outside of the lighter area, left-click the mouse and drag clockwise to rotate the marquee until one side of the cropping window is parallel with one edge of the pictured window frame.
- You can adjust the cropping window until the selection is aligned with one edge of the picture.
- Place the pointer inside the crop marquee, and drag the handles of the marquee until all the parts of the picture you want shown are inside the selection box.
- It is easier use the handles on the corners of the crop window to match the edges of the image. If you need to adjust the sides of the selection window, use the handles along the sides of the cropping selection window.
- Press Enter. The image is now cropped, and the cropped image now fills the image window, straightened, sized, and cropped according to your specifications.
Making Adjustments
Adobe Photoshop allows you the ability to make adjustments on the image. They can be done automatically or manually. These adjustments are done through commands. Learning these commands will save you time and money. To make an adjustment on an image, click on the Image option on the Command Menu Bar and select Adjustments from the Drop Down menu. The adjustment options will appear in the pop up menu. Select the Auto adjustment you want and it will be applied to your active image.
The Automatic adjustments are Auto Levels, Auto Contrast, and Auto Color.
If you select a Manual adjustment from the menu, you will need to adjust the settings within that command option. The Manual adjustments are Levels, Curves, Color Balance, Brightness/Contrast.
The Automatic adjustments are Auto Levels, Auto Contrast, and Auto Color.
If you select a Manual adjustment from the menu, you will need to adjust the settings within that command option. The Manual adjustments are Levels, Curves, Color Balance, Brightness/Contrast.
Removing Color Casts
Some images contain color casts (imbalanced colors), which may occur during scanning or may have existed in the original image. The Auto Color command will brighten the colors of an image by searching the actual image for shadows, midtones, and highlights. It neutralizes the midtones and removes (clips) the white and black pixels based on the values set in the Auto Correction Options dialog box.
The Auto Corrections dialogue box lets you automatically adjust the overall tonal range of an image, specify clipping percentages, and assign color values to shadows, midtones, and highlights. You can apply the settings during a single use of the Levels or Curves dialogue boxes, or you can save the settings for future use with the Levels, Auto Color, and Curves commands.
The Auto Corrections dialogue box lets you automatically adjust the overall tonal range of an image, specify clipping percentages, and assign color values to shadows, midtones, and highlights. You can apply the settings during a single use of the Levels or Curves dialogue boxes, or you can save the settings for future use with the Levels, Auto Color, and Curves commands.
The Histogram
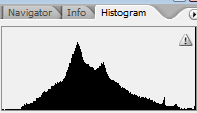
The histogram is a visual representation of your image. The left side represents the shadows of your picture. The right side represents the highlights of your image, and the middle section represents the midtones in your picture.
Replacing Colors
With the Replace Color command, you can create temporary masks based on specific colors and the replace these colors. (A mask isolates an area of an image so that changes affect just the selected area and not the rest of the image.) The " Replace Color dialog box contains options for adjusting the hue, saturation, and lightness components of the selection: "Hue" is color, " Saturation" is the purity of the color, and " Brightness" is how much white and black is in the image.
Adjusting Lightness

There are times when the picture we take is too dark in an area. To lighten this area the photographer will use the Dodge Tool The Dodge Tool is based on a traditional photographer's method of holding back light during an exposure in the darkroom to lighten a darker area of an image.
Adjusting Saturation
There are also times when the picture we take is too light. To darken this area the photographer will use the Sponge Tool. The Sponge Tool performs a function previously done in the darkroom known as "burning-in." The photographer would allow the photographic paper to be exposed by more light in the lighter areas of the picture to make them darker.
Adjusting Contrast
The last task you may do when retouching a photo is to adjust the contrast in the image. Adobe Photoshop has a number of ways to adjust the contrast in photographs. However the method you choose to use, the most simple is by adding filters. When you add a filter to the images in Adobe Photoshop you apply special visual effects to your images. To adjust the contrast in your image you will apply the Unsharp Mask filter. The Unsharp Mask filter adjusts the contrast of the edge detail and creates the illusion of a more focused image.
The most effective way to learn Filters is to play with them. Start with a few that sound familiar to you.
Before you use any of the filters, create an image in your mind's eye of what you expect to see. This is important for building your skills and your mental reference library.
The most effective way to learn Filters is to play with them. Start with a few that sound familiar to you.
Before you use any of the filters, create an image in your mind's eye of what you expect to see. This is important for building your skills and your mental reference library.
About Unsharp Masking
Unsharp Masking or USM, is a traditional film-compositing technique used to sharpen edges of an image. The Unsharp Mask filter corrects blurring introduced during photographing, scanning, resampling, or printing. It is useful for images intended for both print and online viewing.
The Unsharp Mask locates pixels that differ from surrounding pixels by the threshold you specify and increases the pixel's contrast by the amount you specify. In addition, you specify the radius of the region to which each pixel is compared.
The effects of the Unsharp Mask filter are far more pronounced onscreen than they are in high-resolution output. If your final destination is print, experiment to determine what settings work best for your image.
The Mode Command
When you have finished making all the adjustments on your image, it is ready for publication. At the beginning of the preparation, we needed to decide how our image is to be used. The three major uses of any image are Internet, presentation, and publication. We are preparing this image for publication.
There are 7 different modes in Adobe Photoshop. You will likely not use more than 3 of them, so we will only explain those 3.
There are 7 different modes in Adobe Photoshop. You will likely not use more than 3 of them, so we will only explain those 3.
- Grayscale mode is a method of removing all color from an image. It is best to think of grayscale as a black and white image. The values from black to white are included in the grayscale mode.
- RGB Color: The primary colors of light are red, green, and blue. You can mix any value of these colors to create any other visual color. Most of your images will be created in RGB mode. You can think of RGB mode as color images.
- CMYK Color: Many publishing companies will print their images in magazines or other publications. These printing machines use the secondary colors of Cyan, Magenta, and Yellow to create the colors on a printed page. Hey also add Black to increase or decrease the value of these colors. The letters they use are the first letters of each color, however, B is already used to identify the primary color of blue so they use the K in black to identify the color of black.
File Formats
There are many different image file formats. Each format was created for a specific purpose.
Camera Raw, or RAW files are like negative images from the film era. They have all the information that is necessary to create the image for viewing. They cannot be used without some conversion.
The most common file formats are DNG, JPEG, TIFF, and PSD.
The Adobe Digital Negative (DNG) format contains raw image data from a digital camera as well as metadata that defines what the image data means. DNG is meant to be an industry-wide standard format for camera raw image data, helping photographers manage the variety of proprietary camera raw formats and providing a compatible archival format.
The Joint Photographers Experts Group (JPEG or JPG) file format is commonly used to display photographs and other continuous tone RGB images on the World Wide Web. JPEG format retains all color information in an image but compresses file size by selectively discarding data. The greater compression, the lower the image quality, and vice versa.
The Tagged Image File Format (TIFF or TIF), is used to exchange files between applications and computer platforms. TIFF is a flexible format supported by virtually all paint, image-editing, and page-layout applications. Also, virtually all desktop scanners cna produce TIFF images.
The Photoshop format (PSD) is the default file format for the Adobe company. Because of the tight integration between Adobe products, other Adobe applications can directly import PSD files and preserve many Photoshop features.
