Lesson 1: Cameras

Despite striking differences in appearance, all cameras have similar systems for viewing and recording images- as all human eyes do. The eye and the camera have a rigid outer covering, are light-tight, and provide a sensitive surface capable of registering an image projected by light (eye-retina; camera- image sensor). There is also a lens system in each, as well as a mechanism for regulating the amount of light that enters (eye: iris; camera: diaphragm). Muscles surrounding the lens of the eye change the curvature of the lens to make it focus on objects at various distances; the photographer focuses the camera by adjusting the position of the lens instead. In both eye and camera, the image is registered upside down and laterally reversed on the light-sensitive surface. It is turned right-side up and left to right by the brain in one case; during developing and printing in the other case. The major similarities between the eye and the camera are in diagram 1.

Diagram 1: Comparison between the human eye and the camera.
To understand fully how the eye functions, you would need to learn a great deal about its various parts. Similarly, to understand how to use the camera to make photographs that express your ideas, you need to become familiar with its various systems and how they function.
Comprehension 1
Comprehension 1
Camera Systems
There are five basic systems inside a camera. The viewing system allows the photographer to view and compose the picture. The focusing system adjusts the distance between the lens and the focal plane, where the image sensor rests, to bring the subject into clear outline. The shutter system controls the length of time light reaches the film. (In digital cameras, the shutter is a switch that turns the image sensor on and off.) The aperture system consists of a diaphragm that controls the amount of light that reaches the image sensor by changing the opening size. (The diaphragm also controls a critical measurement in photography called depth of field) The lens is the glass optical mechanism that admits light into the camera.
The Viewing System
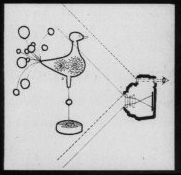
Your first concern as a photographer is the means by which the camera lets you see and compose the scene it will record. Most cameras fit into one of two basic viewing-system classifications: viewfinder or single-lens reflex (SLR). The viewfinder camera uses two lenses to view and take the picture. The viewing system is a simple optical device that gives the effect of looking through a small window directly on the scene in miniature. The camera uses the second lens to take the picture. Unless specifically corrected, viewfinder cameras can present a viewing problem called parallax error. This is a difference between what the photographer sees and the area actually recorded by the camera lens (see image to the left). In more costly, sophisticated viewfinder cameras, parallax error is corrected to permit accurate slighting if the camera is at least 3 feet from the subject.
In the single-lens reflex (SLR) camera light passing through the picture lens is reflected from a mirror in front of the focal plane and projected up through a viewing screen into a five sided prism that turns the image vertically and horizontally so that it is seen as it actually is. This viewing system eliminates parallax error because the photograph is composed through the picture lens. It is especially well suited to photograph subjects less than 3 feet away (close-ups), because out-of-focus elements are easily visible.
Note: The newer digital point-and-shoot cameras are replacing the viewfinder with an LCD screen
Comprehension 3
The Focusing System
Early box cameras and some inexpensive models are designed to produce a relatively sharp image as long as the subject is at least 6 feet from the camera. Other cameras have manual focusing mechanisms which require that the photographer estimate or actually measure the distance between the camera and subject and then set the camera accordingly. In order to achieve sharp images in picture, a dependable means for focusing-that is, relating the distance between camera and subject to the distance between lens and film- is essential. The two focusing mechanisms in most sophisticated contemporary cameras are the rangefinder and the ground-glass viewing screen.
Comprehension 4
The Shutter System
The shutter is the light switch of the camera. Pressing the shutter release button is like turning on a light. The shutter speed setting determines the length of time the shutter is open and thus how long the light is "on" and entering the camera. When you press the shutter-release button, light enters the camera at the preset speed, measured in fractions of a second- 1/60th of a second, 1/125th of a second, etc. The longer the shutter is open, the more light will strike the image sensor. By adjusting the shutter speed and the aperture size (opening of the lens), you vary the exposure of the film according to the needs of the situation- whether a sunlit room or a dark forest- and the desired artistic content of the photograph. Thus, shutter speed setting and aperture setting function together to control light.
Setting Shutter Speed
All shutters are geared to remain open for a period of time set by the photographer. The setting controls the time of the exposure. Most shutter speed dials have settings from 1 second up to 1/1000 or 1/2000 of a second. The time of each shutter setting is approximately half as long as the time of the one before it, and twice that of the one after it. For example, a setting of 125 (1/125 of a second) allows only half the exposure time of 60 (1/60 of a second).
Most shutters also have either a B (bulb) setting or a T (time) setting, and some have both. When the shutter is set on B, light is admitted tor as long as the shutter release is pressed down. The B setting is suitable for exposures of more than 1 second and less than 30 seconds. The T setting is more efficient for longer exposures. It keeps the shutter open until the shutter release is pressed again or the shutter-speed knob is rotated.
When setting your shutter speed always make sure the setting is precisely opposite the indicated reference point. In-between settings can ruin your photographs and even damage the shutter mechanism.
When photographing stationary subjects, usually you determine the shutter speed setting by measuring the amount of available light and relating it to the type of film (ISO in the digital camera) and the depth of field desired. Thus a rock in a field can be photographed with a handheld camera at 1/60, provided your hand is steady enough to prevent he camera from moving while the shutter is open.
When you photograph moving subjects, setting the shutter speed can be more complex because the shutter setting critically affects the appearance of motion in the photograph. If you photograph a moving subject at a relatively slow shutter speed, the subject's movement will be recorded on film and the photograph will appear blurred. For a sharp outline of a moving subject the speed of the shutter must be fast enough to "stop" the subject's motion. However, photographers can obtain striking effects by manipulating shutter settings to advantage to produce deliberately blurred photographs.
In choosing the correct shutter speed to stop the action of a moving subject, three variables must be considered, the speed of the subject's movement, the angle of the subject's movement in relation to the camera, and the distance between subject and camera. Swinging the camera in an arc to follow the movement of the subject- a technique called panning- is another option.
Comprehension 5
The Aperture System
The aperture of a camera functions with the shutter to control the amount of light that reaches the image sensor. Located inside the lens, the aperture consists of overlapping thin metal leaves that form a circle called the diaphragm. By turning an adjustment on the lens, the photographer moves the leaves toward the outside of the circle. This widens the diameter of the aperture and permits more and more of the available light to enter. When the diaphragm is adjusted in the opposite direction, less available light enters.
A standard scale of numbers called f/stops, measured from f/1.0 to f/64, is used to indicate aperture size. The maximum opening, admitting the most light, is f/1.0. The smallest, admitting the least, is f/64. Each succeeding f-stop is one-half the size of the previous f-stop and decreases the amount of exposure by half. Thus an f/4 aperture admits half as much light as f/2.8. (It is easier to remember that larger numbers mean smaller openings if you think of the f-numbers as fractions, which they actually are. The process of decreasing the aperture opening is called "stopping down." Thus, a change from f/2 to f/4, even though 4 is numerically a larger number than 2, is stopping down. Increasing the opening is called "opening up."
Be careful not to confuse the numerical value of the f/stop numbers with the size of the aperture. A common mistake is to suppose that because f/4 is numerically twice f/2, the amount of exposure for f/4 will be half that of f/2. Actually, the aperture set at f/2.8 is half as large as that at f/2, and the one set at f/4 is only one fourth as large. Remember, regardless of the numerical value of an f-stop, each higher numbered f-stop lets in half as much light as the one before it, and each lower numbered f/stop lets in twice as much light.
Although the possible f-stop range is f/1.0 to f/64, no lens has a full range of possible f/stops. The lens on a 35 mm camera generally has a maximum aperture of f/1.4 and a minimum of f/16. You can set the aperture anywhere between the reference points. Interim settings are commonly used with color film, but they are seldom necessary for black-and-white photography.
Aperture and Depth of Field
In addition to affecting the amount of light entering the camera, the aperture size also helps to determine depth of field. Depth of field is the measurement in a scene of the area between foreground and background in which subjects will be in sharp focus. To determine how much depth of field may be necessary you must take account of aesthetic as well as technical considerations. A large aperture produces very little depth of field, while a small aperture produces a large amount of depth of field. For instance, if you want to have only the foreground, only the background, or only the middle ground of a scene in focus, then you must choose a large aperture in order to limit the depth of field. If, on the other hand, you decide to have all three areas as sharply focused as possible, then you must close down the aperture to expand depth of field.
Comprehension 6
Aperture and Shutter Speed
Since aperture and shutter speed function together to control the amount of light entering the camera you must correlate aperture setting and shutter speed setting to achieve a satisfactory exposure. Remember smaller aperture sizes give greater depth of field, so that when you know the amount of light needed to expose the image sensor properly, you may want to decrease the aperture size to improve depth of field and increase the shutter speed. But when you decrease shutter speed, you must increase the aperture size. In other words, you must compensate for the decreased amount of light coming through the aperture by increasing the amount of time during which light is permitted to enter. Because consecutive shutter speeds are related to one another in the same f/stop numbers- each consecutive lower number giving twice the exposure as the preceding number- the exposure will be correct as long as the two factors are correctly correlated, as in the diagram 9 (Insert diagram) Failure to correlate the f-stop number and the shutter speed can result in a film that is either overexposed or underexposed.
Besides achieving a properly exposed film, use of these correlations will produce various visual qualities. With some cameras, it is difficult to stop action and retain great depth of field, although this is usually not a problem with 35 mm cameras and fast film. Properly correlating aperture and shutter speed to light conditions, motion of the subject and depth of field is always an important element in getting the photographs you want.
Comprehension 7
Digital Cameras
There are four types of digital cameras: phone or PDA, Point and Shoot, Single-Lens-Reflex and Professional or Studio cameras. All digital cameras have some components not found in traditional film- based cameras. The major differences between digital and traditional cameras are the methods in which they read and store the image information.
There are four types of digital cameras: phone or PDA, Point and Shoot, Single-Lens-Reflex and Professional or Studio cameras. All digital cameras have some components not found in traditional film- based cameras. The major differences between digital and traditional cameras are the methods in which they read and store the image information.
Reading Image Information

Digital cameras have an image sensor. The image sensor collects the light and changes it into electronic signals. One type of sensor is the charge-coupled device, or CCD. CCD's are very expensive and are limited in their use. They are, however still used when extremely high quality is needed, such as scientific and medical applications. All digital cameras, except the highest end consumer cameras have switched to a different solid-state sensor called a complementary metal-oxide semiconductor, or CMOS sensor.
The CMOS sensor is a small grid of light sensors, called photo sites. The photo site will read the light coming through the lens and converts that light into an electronic signal. Those electronic signals are then reconstructed on the LCD monitor of the camera or computer as a virtual image. When you zoom in close on an image you can see the individual squares of the grid. These squares are called pixels, which is an acronym for picture elements or tiny parts of a picture.
When the pixels of an image are visible, the phenomenon known as pixelization occurs. These pixels are the smallest unit that make up the image and improve its resolution or clarity. Low resolution images usually have 1584 pixels per square inch or a 72 pixel resolution. These images are used primarily for Internet web pages because the file size is small and will open quickly as the web page is accessed. High resolution images usually have a resolution of 200 or 300 pixels. They are used primarily for printing purposes like magazines, or books.
The camera will allow you to select or change the file size of each image. The four most common selections are Extra Fine, Fine, Basic, and Normal. We can compare these to the print sizes you can order from a local studio. The file sizes are identified in pixel measurements. To simplify the numbers we will convert them to the standard inch measurements. An extra fine image is 2582x1944 pixels (36x27 inches). Fine images are 2048x1536 pixels (28.4x21.3 inches). Basic images are 1600x1200 pixels (22x16 inches). Normal images are 640x480 pixels (8.9x6.7 inches).
As you work with the different file sizes, it is important to understand that most file sizes have some amount of compression that occurs. This compression will affect the resolution or clarity of the image. Your larger images have less compression, and are a higher resolution image.
Comprehension 7
Sensors

During an exposure, the camera uncovers or activates the photo sites, so they can react to the light particles (photons). Once the exposure is over, the camera covers or deactivates the photo sites so that no more light can strike them. The brighter the light hitting any one photo site, the greater the electrical charge that is collected at that site.
Each photo site does two things. First, it measures the strength or intensity of the light hitting it. Second, it captures the red, green, or blue components of the scene through a single red, green, or blue filter covering its surface.
Then, during the exposure, many transistors at each photo site amplify and, by the use of a small wire, transport the electronic charge. Each photo site is individually read, but these readings aren't perfect. CMOS chips are susceptible to misreading of the electronic information creating a phenomenon called noise, or visual flecks that do not match the rest of your image.
Comprehension 8
Capturing and Storing an Image

When you press the shutter release button, the camera will adjust the focus on the lens. The image will be captured and then transferred into a temporary storage area inside the camera called "buffer memory," or simply the "buffer." When the buffer is full, the image is written out to your storage media, such as a memory card. The buffer size in the camera is an important thing. It tells how many images you can take in quick succession. If you have a tiny buffer in your camera, you will have to wait a bit after you take several images.
The removable memory device depends on the brand of camera. These devices include the compact flash, secure digital (SD) card, Memory stick, or compact disk. The newer digital cameras now have an internal storage memory.
Comprehension 9
The removable memory device depends on the brand of camera. These devices include the compact flash, secure digital (SD) card, Memory stick, or compact disk. The newer digital cameras now have an internal storage memory.
Comprehension 9
Assignment 3: Shooting 1- Bracketing Exposures
As a beginning photographer, it is important to learn how to read light. The practice of bracketing allows you to see the changes that occur when you independently adjust the aperture setting or the shutter speed setting on the camera.
Capture Bracketed Exposures

You should only adjust the aperture setting or the shutter speed setting in this assignment, NOT both. Select a single subject to capture.
- Set your camera on Program, Manual, or the TV setting.
- Adjust your shutter speed to the longest shutter speed setting. On the school cameras it is 15" (15 Seconds)
- Take 1 picture of your chosen subject. (There will be a delay in the camera's operation as it "buffers" the picture)
- Adjust the Shutter speed setting to the next faster exposure time on your camera. On the school cameras it is 13" (13 seconds)
- Take a second picture of your chosen subject.
- Continue adjusting the shutter speed as you take 1 picture at each setting until you have completed the entire range of your camera's shutter speed settings.
Transferring Images
To transfer these images from the camera to a computer, you will need a cable for your camera or card reader and a computer. The cable will connect directly between the camera and the computer. Your computer has a hard drive built in. When you attach the camera to the computer with a cable, the camera becomes a removable hard drive.
Transfer your images into a new folder. Name the new folder: "Bracketing."
Transfer your images into a new folder. Name the new folder: "Bracketing."
Assignment 4: Contact Sheet 1- Bracketing
Using the pictures you took for assignment 3 and the Adobe Photoshop software, create a proof sheet (contact sheet) that shows your series of exposures. It should be very light or white on one end and very dark or black on the other end.
Creating Contact Sheets

Adobe Photoshop is the image editing software we will use in this class. It has the capability to perform automatic functions as well as manual functions. We will use an automatic function to create our contact sheets.
- On the desktop, click on the Start button.
- On the left side of the Start menu, double-click the Adobe Photoshop CS2 icon to start Adobe Photoshop CS2.
- When prompted, click "Close" to close the Welcome Screen.
- Select File from the command menu bar.
- Select Automate from the drop down menu.
- Select Contact Sheet II from the pop up menu.
- A new window called Contact Sheet II will open. It has 5 separate areas. You will use three of them.
- In the Source Images area use Folder and Browse to find your new folder. Follow the promptings on the screen.
- In the Thumbnails section, leave the Columns at 5 and change the rows to 7.
- Click OK in the upper right corner. The computer screen will flash for a few minutes. Be patient. When the automation is complete, your contact sheet will appear on the screen.
- Save your contact sheet in your "Bracketing" folder.
Lenses
A lens is a piece of transparent substance, usually glass or plastic, having two opposite surfaces either both curved or one curved and the other one plane, used in an optical device in changing the direction of light rays (convergence). The size of lens is identified by its focal length. Focal length is the distance between the center of the lens, where the light direction changes, and the point of convergence of the light rays inside the camera when the focus is set at infinity.
In photography, there are many different brands and lengths of lenses. The five basic types of lenses are the prime lens, zoom lens, normal lens, telephoto lens, and wide-angle lens. The Prime lens is attached to a camera and cannot be removed or adjusted. The focal length, or distance between the center of the lens and the light ray convergence, is fixed and cannot be adjusted. The established distance will focus about 3 feet to 10 feet in front of the camera to infinity.
The zoom lens is also attached to the camera and cannot be removed, however, the focal length can be adjusted to different distances, allowing the photographer to zoom in closer or zoom out farther away from the subject.
The normal lens has a 50 mm focal length can be removed from DSLR cameras and will approximate the view of a single human eye.
The telephoto lens can also be removed from a DSLR and will work like a zoom lens. You can zoom out to see things that are far away. It also has a control ring that will allow you to zoom in on something very close to the camera. This capability is called "macro". Macrography is used to photograph something as it is seen by the human eye. An example would be a picture of the petals and leaves of a flower.
The wide-angle lens can also be removed from a DSLR camera and will allow you to take pictures of large areas. It is especially good for taking pictures of scenery or fields.
Comprehension 10
Modes of Operation
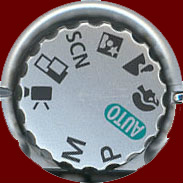
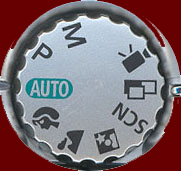
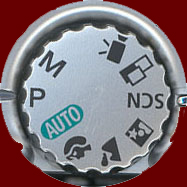
Your camera has an operation modes dial. It is usually located on the top of the camera body. The number of modes will depend on the brand of camera you own. When the appropriate shooting mode is selected for the shooting conditions, most cameras automatically adjust the settings for optimal shooting. The most common modes are set into two zones- The image zone and the creative zone. We will look at each zone separately.
The Image Zone
The image zone has 6 individual settings. They are the Portrait, Landscape, Night Scene, SCN (Special Scene), Stitch Assist, and Movie modes.
Portrait

The portrait setting is used to take pictures of people. It blurs the background and makes the subject or person stand out. The icon looks like a head of a person.
Landscape

The landscape setting is used to take pictures of wide areas. The setting is adjusted so that subjects near to the camera and subjects farther away from the camera appear to be in focus in the picture. The icon looks like a mountain range.
SCN (Special Scene)

The special scene setting allows you to select the most appropriate settings for a scene. There are a number of different settings within this option. This setting will not be used much as part of this course. However, you can experiment with the various settings and decide what will work best for your desired uses.
Night Scene

The night scene setting allows you to capture human subjects against the backdrop of an evening sky or night scene. The flash is directed at the person and the shutter speed is slow, so both the person and the background can be beautifully captured. The icon looks like a person with a star above the left shoulder.
Stitch Assist

The stitch assist setting allows you to shoot overlapping images that can later be merged (stitched) to create a panoramic image on a computer. The icon looks like one picture frame overlapping another picture frame.
Movie
The movie setting shoots a movie when you press the shutter button. This will record sound and live action. The icon looks like a motion picture camera.
Auto
The Auto setting allows the camera to set the shutter speed and aperture values to match the brightness of the subject. Most people who like to take pictures use this setting because they do not have to do anything other than point the camera at the subject and press the shutter release button. The icon is the word Auto.
The Creative Zone
The creative zone generally has 4 settings: Program, TV, AV, and Manual. The classroom cameras have only 2 settings: Program, Manual
Program
The Program setting allows the camera to set the shutter speed and aperture values to match the brightness of the subject.The icon is the letter P
TV
The Tv setting on the camera is the shutter priority setting. It allows you to select the shutter speed and the camera will then select the aperture value to match the brightness of the subject. Faster shutter speeds allow you to capture an instantaneous image of a moving subject, while slower speed create a flowing effect and allow you to shoot without a flash in dark areas. The icon are the letters Tv
AV
The Av setting on the camera is the aperture priority setting. It allows you to select the aperture value and the camera will then select the shutter speed to match the brightness of the subject. Lower aperture values (opening the aperture) allows you to blur the background and create a beautiful portrait. A higher apterure value (closing it) brings the entire range from foreground to background into focus. The larger the aperture value, the greater the range of the image brought into clear focus. The icon are the letters Av
Manual

The M setting on the mode dial is the manual setting. It allows you to manually set the shutter speed and aperture value to shoot images. When you push the shutter release button halfway, the difference between the standard exposure and the selected exposure appears on the LCD screen. If the difference is more than 2 stops higher or 2 stops lower than the standard exposure, the "-2" or "+2" will appear in red.
The password for the quiz is: cameras
