Lesson 11: Artificial Lights
Early Photographers could make photographs only on bright sunny days because of the slow speed of their plates and films. As the sensitivity of the film increase, photographers could use artificial light produced by burning flash powder. This basic and often dangerous source of light was eventually replaced by more dependable and safer sources of light using electricity.
Artificial electric light bulbs can provide steady illumination. Electronic flashes will give a burst of intense light for a short duration. With artificial light, photographs can be made when there is not sunlight or not enough. Artificial light can also give more control in direction and character. In other words, artificial light can imitate sunlight or it can produce illumination not found in nature.
Artificial light has unique properties that distinguish it from sunlight. It radiates in all direction from its source; it loses its intensity as it travels away from its source; it is either specular or diffused.
There are two major categories of artificial light. Electric light bulbs that are plugged into a conventional electrical outlet and give continuous illumination are called studio lights. Although some of them a large and difficult to carry, others can easily be used outside a photographic studio. The other category of artificial light is flash photography.
Studio Lights
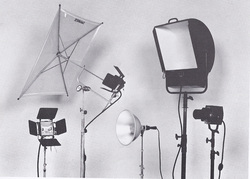
There are many types of lights, however, each of these types are subtypes of four basic types of studio lights: flood, spot, umbrella, and pan reflector.
The floodlight is either a high-wattage tungsten frosted bulb, commonly called a photo-flood, or a tungsten-halogen bulb, commonly called a quartz light, in a mat reflector.
Quartz lights are more expensive than photofloods but they are brighter. They are excellent for color photography because they do not change as they age with use. Photofloods tend to give off more yellow light with age.
At times, photographers want to control the direction of light by attaching metal flaps to quartz light. These metal flaps are called barn doors because they swing out like a door. The photographer also sometimes place a diffusion screen made of translucent fiberglass in front of a floodlight to soften the light.
Spotlight

Spotlights contain a bare, unfrosted tungsten bulb, a polished reflector, and a lens that condenses light and projects it as a narrow, intensely focused beam. The beam can be further narrowed by adjusting the focus and by means of a “snoot,” a tube of sheet metal placed over the spotlight that transmits the light only through a small circular opening. The spotlight may also have barn doors to control the light. Spotlights are available in many sizes from 3 inches to 6 inches in diameter.
Umbrella Light
Umbrella lights are actually a combination of an umbrella reflector and a light. It is a popular lighting method. The umbrella is usually made of a mat or reflective silver cloth. It can be the size of a conventional rain umbrella or larger. It is attached to a light stand with a bracket that also holds a quartz light or electronic flash unit. The light is aimed at the inside concave portion of the opened umbrella, producing a broad and even distribution of light.
Pan-Reflector Light
Pan-reflector lights get their name from its rather large, bulky reflector. It is an expensive light that uses either a quartz light or groups of them. The light or lights are reflected off a curved white metal surface that looks like a pan. This light is bright, has some direction produces very soft shadows, and gives broad, even coverage. Barn doors and a diffusion screen may be added to a pan reflector.
Exposure and Distance of Light
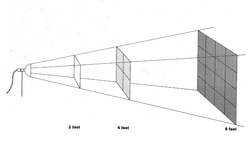
To understand how light affects exposure we need to understand one of the major properties of light. This property of light is called the inverse square law. Artificial light loses its intensity as it travels away from its source. When the distance between the light source and subject is doubled, the subject receives only one-quarter of the amount of light produced at the source. In other words, as the distance between the light source and the subject doubles only one quarter of the amount of light reaches the subject.
Because of this reduction in light intensity, each time you double the distance between the light source and the subject, you need to increase the aperture size by two f-stops. Or you can decrease the shutter speed by two speed settings. The law works in reverse, naturally; when you halve the distance between the light source and the subject, you need to decrease the aperture size or increase the shutter speed also.
Because of this reduction in light intensity, each time you double the distance between the light source and the subject, you need to increase the aperture size by two f-stops. Or you can decrease the shutter speed by two speed settings. The law works in reverse, naturally; when you halve the distance between the light source and the subject, you need to decrease the aperture size or increase the shutter speed also.
Direction of Light
The direction from which light strikes a subject affects the way the camera sees the subject. This is true for natural as well as artificial light. Studio lights, however, enable you to illuminate a subject from any of a number of different directions at a given time.
The six basic directions of light are: Front lighting, side lighting, Classic 45˚ lighting, back lighting, Top lighting, and Bottom lighting.
The six basic directions of light are: Front lighting, side lighting, Classic 45˚ lighting, back lighting, Top lighting, and Bottom lighting.
Front Lighting

Front lighting results when the floodlight is placed directly above or directly to the side of the camera. It is not usually a pleasing type of lighting for portraiture because it illuminates small local shadows and makes the face look two dimensional or flat. It is sometimes called “flat.” Another name for front lighting is flat lighting. Some photographers use front lighting intentionally to get the flat effect. Front lighting often results in pictures taken with a flash unit attached to the camera.
Side Lighting

Side lighting results when the floodlight is placed level with the subject’s head and at a 90˚ angle to the subject. If the subject is looking directly at the camera, the light should be aimed directly at the ear of the subject. This lighting will change the shape of the subject’s face, making it appear longer and thinner than with front lighting. Portions of the face are now distinctly separated, and giving roundness to the planes of the cheeks and forehead, and the illuminated hair is strikingly set off from the background.
Classic 45 degree angle lighting

Classic 45˚ lighting results when the floodlight is placed somewhat higher than the subject’s head and then aimed down at the subject at a 45˚ angle. The light should be aimed midway between the ear and the camera when the subject is looking into the camera. This type of lighting is popular because of the three-dimensional effect it produces in the face.
Back Lighting

Backlighting results when the floodlight is placed directly behind the subject in such a way that it does not shine into the camera lens. It should not be placed too close to the subject or it may give the ears a strange look. Because the face is not lit, back lighting is seldom used alone but with other lights to separate the head from the background. It can give a halo effect for portraits or light transparent objects to give a glowing quality.
Top Lighting

Top lighting results when the floodlight is aimed down at the top of the subject’s head. Top lighting creates shadows that so dominate the subject that all identity is lost. It is often used with other lights to create highlights on the hair. Barn doors should be used to confine the light to the top of the head, so it will not spill over onto the face, where it will interfere with the main light or shine into the camera lens. This light placement is great for rounded objects that may cause a reflection back to the camera.
Bottom Lighting

Bottom lighting results when the floodlight is placed near the floor in front of the camera and aimed directly up at the subject’s face. The results are dramatically unnatural, exaggerating both form and texture. This kind of lighting is often used to suggest horror or evil.
Reflectors
When a single photoflood is used to photograph a scene, the resulting picture usually has a great level of contrast. If a pan reflector or umbrella is used alone, this contrast is reduced, but the results may still have more contrast than desired. The contrast is caused by the single light brightly illuminating the area it hits directly, while leaving the lesser illuminated part of the scene in deep, dark shadows. Except when you want to make a scene stark and somewhat dramatic, you will generally have to “fill in” those dark shadows to lessen the contrast and “open up” the shadow area to reveal some details. Use a reflector for subtle filling in or another light for more filling in.
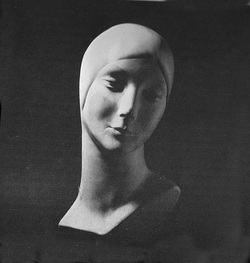 Image shot with a reflector. |
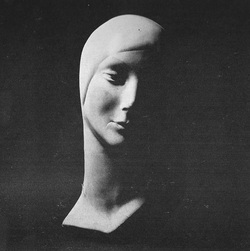 Image shot without a reflector. |
Diffusion
Light from floodlights is sometimes too harsh. To soften its impact, photographers often place a diffusion screen containing a sheet of translucent material directly in front of a floodlight. The material used to soften the light could be paper, plastic, fiberglass, or white muslin cloth. The diffusion material scatters the light, reducing its intensity and widening its direction. When you want maximum diffusion, place the screen closer to the subject than to the light. Screen placement near the subject can be used with pan-reflector lights also, but not with umbrella lights. Be careful when placing flammable diffusion material not to let it come in close contact with the light.
 Image shot without diffusion. |
 Image shot with diffusion. |
Ways to light objects in a studio
There is no one best way to arrange artificial lights for photographing a subject in a studio. The lighting arrangement you choose depends on the results you want. Five types of arrangements are: Single lighting, diffused lighting, silhouetting, edge lighting, and cast-shadow lighting. These are five basic approaches, but there are many other possibilities.
Single light source
When illuminating a subject with a single light, the light should be placed high and to the side, as though it were the sun. The tonal character of the form will have a high level of contrast because there are no other objects to act as reflectors to help lighten the shadows.
|
|
|
Diffused Lighting
When illuminating a subject with a diffused light, the specific placement of the light source is difficult to detect. The light has no real direction because the light rays are spread out when they travel through the diffusion material.
 Image shot in diffused lighting. |
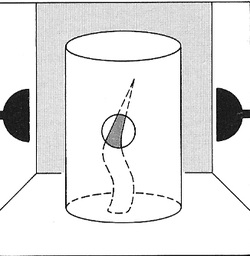 Illustration of set up for Diffused lighting. |
Silhouetting
Illuminating a subject from the back eliminates all detail of the subject. The only detail you can see is the basic shape, or outline of the subject.
|
|
|
Edge Lighting
Placing lights on each side of the subject create outline highlights along the edges of the subject. Barn doors prevent the light from striking the camera lens. This type of lighting emphasizes any imperfections in shape.
Cast Shadow Lighting
To create cast-shadow lighting you will place the desired pattern between the light unit and the subject. This will give the subject the appearance of a changed form.
 Image shot with shadow casting. |
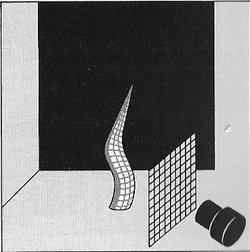 Illustration of set up for shadow casting. |
