Chapter 3: Photoshop Basics

Photographers must be skilled in editing images. The Adobe Photoshop software has been the leading image editing software for many years. The Adobe company has been working hard to make each of their software programs more user friendly. Another image editing software that Adobe created is their Lightroom software.
All of the schools in the state of Utah use the Photoshop software. All course tutorials are to be completed in Adobe Photoshop.
All of the schools in the state of Utah use the Photoshop software. All course tutorials are to be completed in Adobe Photoshop.
The Interface
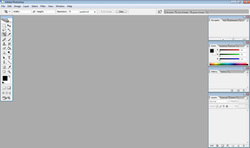
The interface of Adobe Photoshop has 5 separate areas. They are the Command Menu bar, Tool Options bar, the palettes, and the main work space.
The Command Menu Bar

The menu bar consists of nine menus: File, Edit, Image, Layer, Select, Filter, View, Window, and Help. Take a few moments now to look at each of the menus. You may notice that some menu commands are followed by ellipses (...). This indicates a command that is followed by a dialog box where you can enter additional settings. Some menu commands are followed by a right pointing arrow. This indicates a submenu of related commands. As you explore each menu, be sure to take a look at the submenus as well. You'll also notice that many commands are followed by keyboard shortcuts. Gradually, you'll want to get to know these keyboard shortcuts as they can be incredible time savers.
As we make our way through this course, we'll be learning the most useful keyboard shortcuts as we go along.
In addition to the menu bar, Photoshop often has context sensitive menus for accessing some of the most likely commands depending on which tool is selected and where you click. You access the context sensitive menu by right clicking in Windows, or pressing the Control key on a Macintosh.
One of the most convenient contextual menus can be accessed by right clicking/Control clicking on the title bar of a document for quick access to the duplicate command, image and canvas size dialogs, file information, and page setup. If you already know how to open an image, go ahead and try it now. Otherwise, you'll learn how in the next section.
Tool Options Bar

Below Photoshop's menu bar is the tool options bar. The Options Bar is where you would go to adjust settings for the currently active tool. This toolbar is context-sensitive, meaning that it changes according to which tool you have selected. I'll cover the options for each tool as we learn the individual tools later in this lesson.The options bar can be pulled away from the top of the window and moved around in the workspace, or docked to the bottom of the workspace, if you prefer. If you'd like to move the options bar, click on the small line on the far left of the toolbar and drag it to an new position. Most likely, you'll want to leave it right where it is.
Adobe Bridge Button

On the far right side of the tool options bar is the Adobe Bridge shortcut button. This launches the Adobe Bridge, which is a separate application for visually browsing and organizing your images.
The Palettes

When you first open Photoshop, the palettes are stacked along the right edge of your screen in palette groups. The first group contains the Navigator, Info, and Options palettes. Next is the Color Swatches, and Brushes palettes. Below that are the History and Actions Palettes. Finally, you have the Layers, Channels, and Paths Palettes.
Palette groups can be moved around in the workspace by clicking on the title bar and dragging. Each palette group has a collapse and a close button in the title bar area. Try the collapse button for each of the palette groups now. You'll notice the button works as a toggle, clicking the button a second time after the palette is collapsed will expand the palette again. You may also notice that some palettes do not completely collapse. Try collapsing the color palettes and you'll see that the color ramp is still visible.
For palettes that partially collapse, you can completely collapse them by holding down the Alt/Option key as you press the collapse button. You can also collapse a group by double clicking on any of the palette tabs. To display a collapsed palette, just click once on the palette tab if it's in the back of the group, or double click if it's in the front of the group.
Palettes can be resized either by holding your cursor over an edge and dragging when the cursor changes to a double pointing arrow, or by clicking and dragging on the right corner. Only the Color, Options, and Info palettes are not resizable.
Notes for Mac Users I have received reports that the function keys to show/hide palettes do not work on the Mac. Mac users will need to access these commands from the Window menu.When you click the close button on a palette group it closes all the palettes in the group. To display a palette that is not shown, you can either choose the command from the Window Menu, or display the palette using its keyboard shortcut. They are:
- Enter or Return = Show/Hide Options Palette (V5.x only)
- Double click tool button = Show/Hide Options Palette (V5.x only)
- F5 = Show/Hide Brushes Palette
- F6 = Show/Hide Color Palette
- F7 = Show/Hide Layers Palette
- F8 = Show/Hide Info Palette
- F9 = Show/Hide Actions Palette
The Toolbox

You select a variety of tools from the Toolbox by clicking on the icons. Some of the tool icons have a small triangle in the lower right corner. This indicates that the tool has "hidden" tools. You can select the "hidden" tools by dragging the tool to the side or by pressing on the icon until the hidden options drop to the side. See examples below.
Selecting Tools:
These tools allow you to select areas in various different ways. Drawing tools and commands only work in selected areas. If no area is selected, tools and commands will work anywhere on the document.
When you select a tool, the icon will turn white and the cursor will appear when you move it onto the document.
Rectangular Marquee

The Rectangular Marquee tool is used to make square or rectangular selections.
Move Tool

The Move Tool moves selections, layers, and guides.
Lasso Tool

The Lasso Tool is a freehand selection tool. Click and drag around your desired selection.
Magic Wand Tool

The Magic Wand tool allows you to select areas of images based on color similarities without having to trace its outline. It has a tolerance setting in the options bar that will allow you increase or decrease the color range that you need. Increase the numeric value in the Tolerance setting to increase the color range.

Cropping Tool

The Crop Tool trims images
Paintbrush Tool

The Brush Tool paints brush strokes
Clone Stamp Tool

The Clone Stamp Tool removes blemishes and objects.
Eraser Tool

The Eraser Tool erases pixels and restores parts of an image to a previously saved state.
Gradient Tool

The Gradient Tool creates straight line, redial, angle, reflected, and diamond blends between colors.
Type Tool

The TYpe Tool creates type on an image.
Dodge Tool

The Dodge Tool lightens areas in an image.
Color Picker Tool

The current foreground color appears in the upper color selection box in the toobox; the current background color appears in the lower box.
Using the Tools
During this course, you will be introduced to the many tools of Adobe Photoshop CS2 and ways to use them. By the time you finish all the lessons, you will have a solid foundation for further explorations of the Photoshop tool set.
The goal of this course is to introduce you to the integrated set of tools Photoshop CS2 provides for producing sophisticated graphics for print, Web, and mobile viewing.
The goal of this course is to introduce you to the integrated set of tools Photoshop CS2 provides for producing sophisticated graphics for print, Web, and mobile viewing.
